Showing posts with label fabric. Show all posts

Friday, 18 December 2015

Baby Bunting


Thank you for your comments about our robin Christmas cards.
 I'm really glad you like them too. I've finished two more presents this
past week, one for a lovely lady I've met through Instagram and the
other is this bunting for a friend's baby girl. 


I haven't done much sewing lately, I think I like working with yarn
more at this time of year, but I did enjoy making this, especially
 hand sewing the appliques. Our friend requested for the colours - purples and greys with a little bit of pink. I don't use purple much
in my projects but I think they all go well together here. I'm
 particularly pleased with the pink binding. I think it just lifts it a bit,
 making it a little less too purple.


We went to see both new mum and baby last weekend and
they're both doing well. And I'm pleased to say that the whole
family likes the bunting. It's going on the wall next to her crib
and I like to think that she will be looking at it when she's a little
bit older. And when she does I hope she'll like it too.


I just have one more Christmas present to finish and that's it.
School is breaking up for the holidays today and I'm really looking forward to a couple of weeks of just staying at home with the girls.
We'll be making more Christmas cards this weekend and it's the
Strictly Finals tomorrow. I cannot wait!!


Thanks again for your lovely comments.
Enjoy your weekend!


Thursday, 11 June 2015

A Patchwork Blanket


This is my patchwork blanket. It's taken me awhile but here it is
finally all quilted and finished!


It was back in February when I started piecing together my fabric squares. I used two Moda charm packs called 'Marmalade' by Bonnie
and Camille. This was the part that I enjoyed most. It was easy and
relaxing to do and it didn't take me long to stitch them all together.


The next step was basting the quilt top, batting and backing material together. I used normal safety pins for this and didn't have much
trouble doing it. Now I can start hand-quilting but this stage didn't
go as smoothly and as problem-free as the previous two.


Quilting is basically just running stitch worked through all three
layers to keep them together. But even with a no.9 quilting needle,
the longest in the set of six that I got, I really struggled to do this.
I thought the batting, which was leftover from other projects, was
perfectly all right to use. I didn't expect that it would be a little too
thick for quilting. I didn't want to change it though so I had to find
 an alternative to the (useless) quilting needle.


I tried a curved one. It went through the layers easily but it was very awkward to hold, making it difficult to make even and straight stitches.
I gave up on this too. Then at the suggestion of a lovely old lady who
 runs a haberdashery in Whitby I decided to use an embroidery needle.
It's as thin and as sharp as the ones for quilting but it is longer so can
 be held easily while working through the layers. This time it worked! Finally I was able to make progress with the quilting. Hallelujah!

 My stitches are not small, even and perfectly straight as quilting
 stitches are supposed to be but they are neat and effective enough.
And after all that kerffuffle I was just relieved that finally I managed
to get the quilting done.


When it came to adding the binding, I found I didn't have enough
blue bias binding to go round the blanket. It was Markie's brilliant
idea to use two colours instead: dark pink and blue. Well, why not?
It's a bit unusual but again it worked. One of the many things I've
learned from this project is that sometimes you have to think outside
the box or in this case, outside the square!


Despite the quilting hiccups, I'm still glad I kept going and didn't
give up on this blanket. It's actually not very big but just perfect
for covering my lap or both girls' laps when they're watching tv.
The backing material is vintage brushed cotton. It is super soft
and cozy, I'm very sure this blanket will be very popular around
here when the colder months come.

 One other thing that pleases me about this project is that once again
 I made something from materials I already have. It is always so
satisfying to be able to do this. Plus the fabrics are just gorgeous.
I'm actually really happy with this blanket. I love it!


Friday, 15 May 2015

A Pirate Costume


This week I have been busy putting together a pirate costume
for Markie. Their topic at school this half term is titled 'A Pirate's
Life for Me' and all their learning are linked to pirates. As it's the end
of half term next week, their class is having a pirate dress up day.
And of course, as the costume maker in this house, I have to come
up with something that she can wear for this fancy dress day.

I started off by having a look in Pinterest for inspiration. I also looked
in her closet to see if there's anything she can use and found her red
and white stripey dress. She can wear a waistcoat over it and with
 a bandanna and an eye patch I thought she'd look piratey enough.
So that was decided, but first I had to make the waistcoat.


I've never made one before and just wanted something that
would look sort of like a waistcoat. I made a pattern based on one
of her shirts and this had three pieces- two for the front and one for
 the back. They were sewn together and this is how it turned out:


The fabric I used was leftover from her ladybird costume. It's
so flimsy I've had to line it with calico but it also saved me from
having to deal with hems so that turned out okey.


To add a little pirate touch, I embroidered this skull and cross bones
and created a badge.


 The armholes don't quite match and it's all uneven but it's wearable
and I think it goes well with the stripey dress. I'm actually pleased
 with it-- I didn't have to buy any of the materials, Markie likes it
 and most of all it fits!


I hope our girl pirate will have lots and lots of pirate fun at school
on Tuesday. Once again it's been a pleasure making her a costume.
I do wonder though what the next half term' s theme will be...


Hope it's been a nice week for you all. Enjoy the weekend!


Tuesday, 31 March 2015

This ladybird went to the ball


The Ugly Bug Ball that is.


This was the fancy dress day at Markie's school that I mentioned
in my previous post. Her class had been learning about mini-beasts
this half term and to celebrate this the reception children were invited
to come to school dressed as mini-beasts last Friday. Markie went
as a ladybird wearing the costume I made for her.

I've never made a costume before. For fancy dress parties, Markie
usually wears her beloved Elsa dress and Lulu wears fairy wings.
Luckily I found this cute ladybird apron over at Pinterest
(you can see it here) and this was my inspiration for Markie's outfit.
I've looked for the original designer and maker of this apron but have
 been unsuccessful. I would really like to credit whoever it was that
made this. Hope he or she doesn't mind.

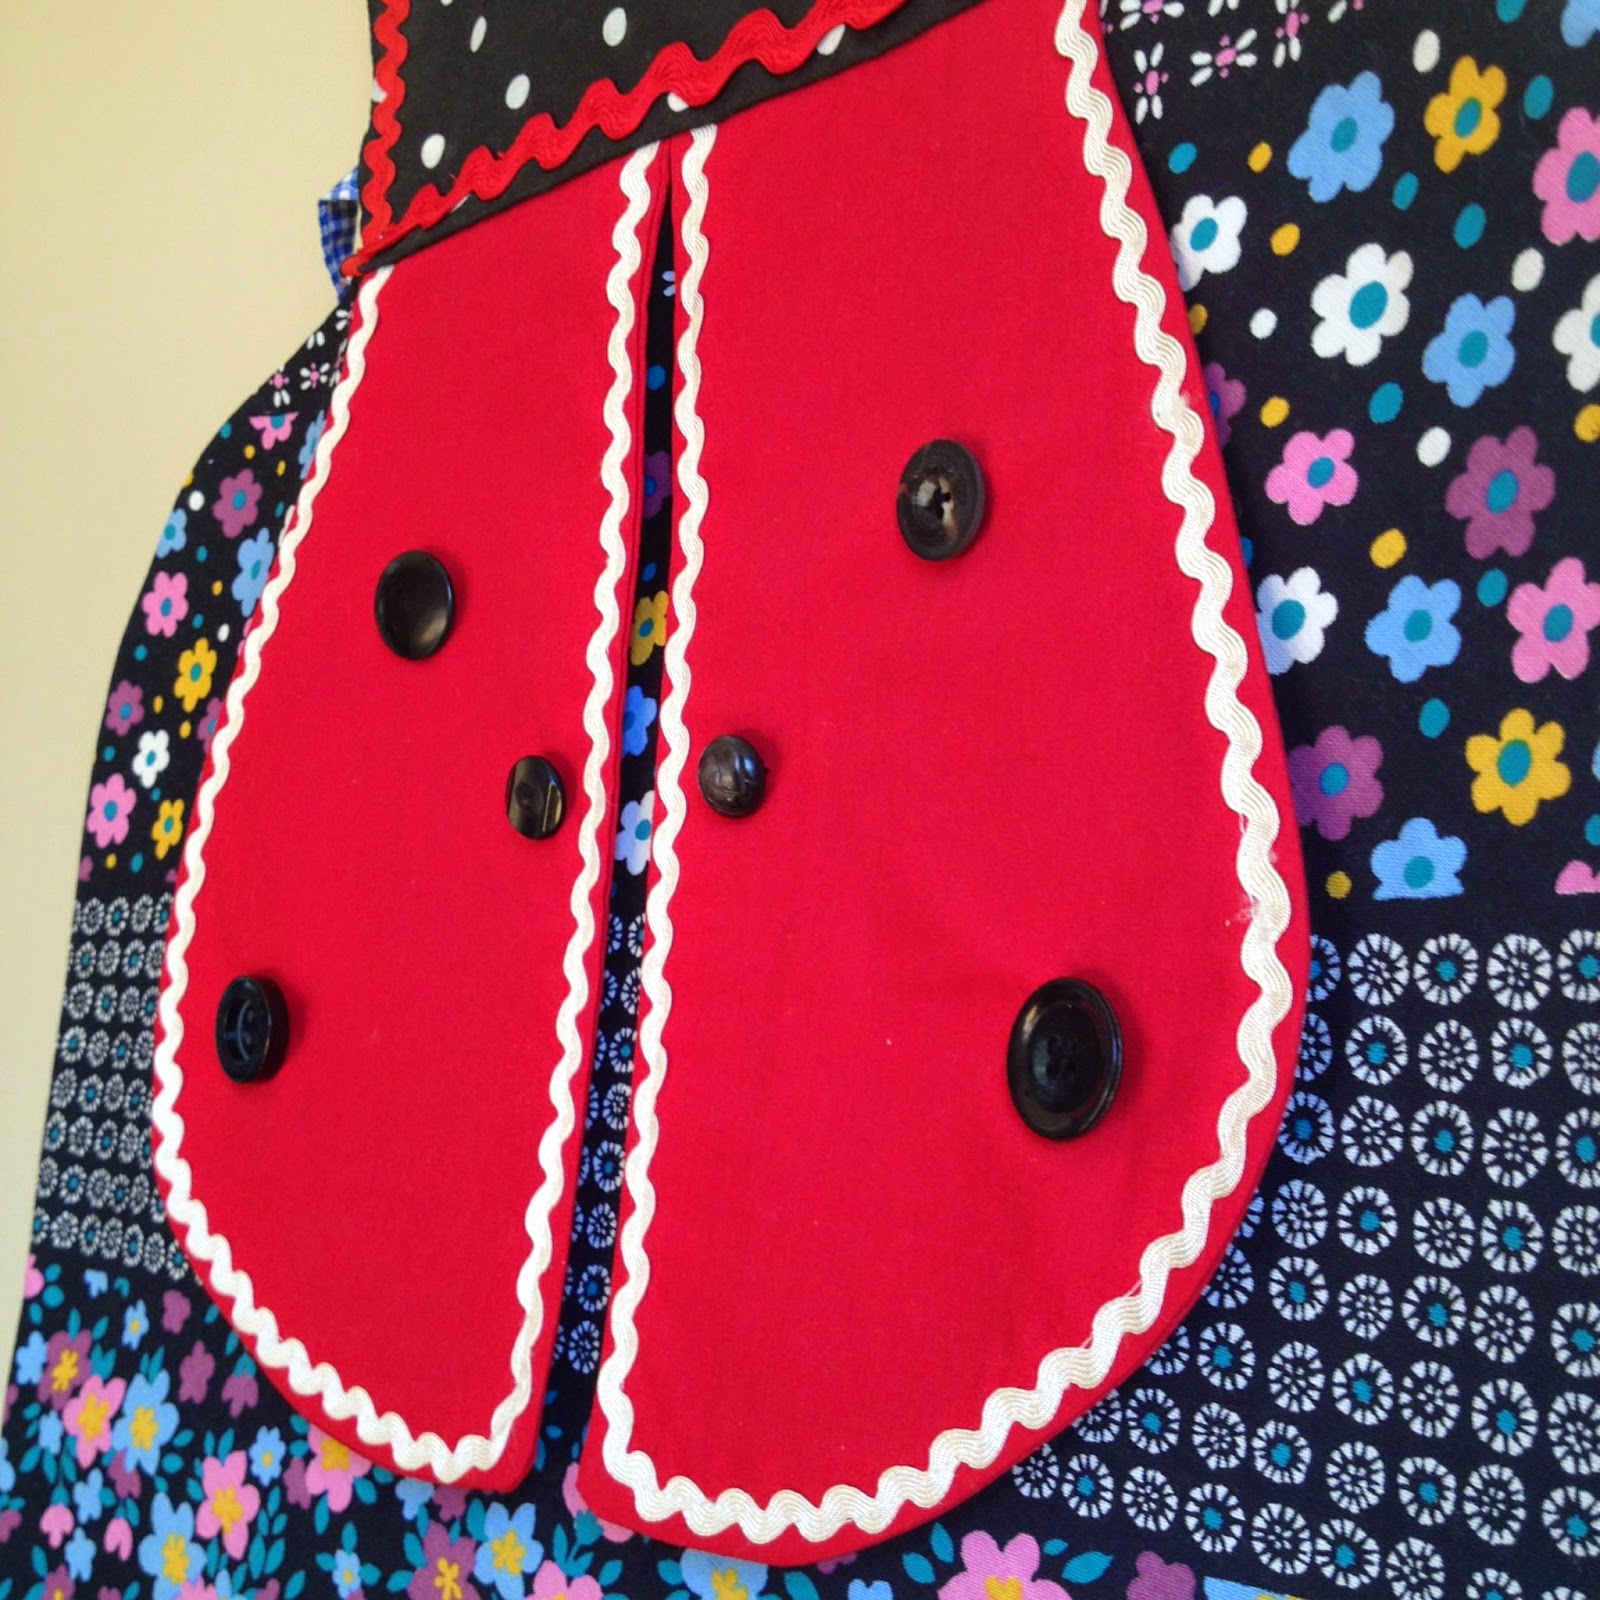
Anyway this was what I made for my big girl: a ladybird pinafore.


On the back I added the wings.


 I lined all the pieces with calico and I also used light weight 
fusible interfacing for the wings so they're not too flimsy.

I worked on this for two evenings last week and I must say I really
 enjoyed the whole process, from drawing the pattern, cutting out the pieces, to sewing and adding the buttons. I'm also quite pleased that
all the materials that I've used were from my sewing stash, apart from the black spotty fabric which I bought for £1.50 for half a metre. 


Markie wore this over black leggings and a black shirt, and she had
matching pom-pom antennas too. I was a bit worried that she
wouldn't like it but she loved the whole thing (phew!) and she had
a brilliant time at the ball which is just fantastic.

This week we're busy preparing for Easter. We've put together
an Easter tree and yesterday I helped Markie decorate her entry
to the school's Easter egg decorating competition. I'm looking
forward to Good Friday and the rest of the weekend as well as
the school break. Some quiet, restful days at home with my girls
will be very welcome.

Thanks to everyone who has been visiting my blog, especially
lately, and for all your lovely comments. They're always very much
appreciated. I wish you all a peaceful Holy Week and a very
happy Easter!


Friday, 13 March 2015

Pot Holders


After making my crocheted pot holder in January, I decided
to make a couple more to use in our kitchen and here they are.
I have hand and machine stitched these two instead of crocheting
 them and I think they've turned out okey. The red one is a bit wonky-
 I was too caught up with sewing the binding to notice that one side
 was more curvy than straight. Oops! Never mind, it's still fine and
 it was good to practice attaching the binding. I'll try and remember
 what I've learned here when I get to the binding stage of my
 patchwork quilt later on.

These pot holders are about 6.5"x6.5" square and all the materials
I used here were from my fabric and sewing stash. The wadding is
 the same one I used for my patchwork quilt and tea cosy. It's thick
enough and these two are great for lifting lids and moving pots
around when we're cooking on the hob. I think they're also good
 as table mats and they add some lovely colour to our kitchen.
I'm really glad I made them!

So it's Friday again. Wishing you all a great weekend full of fun
and sunshine. Ours will be a staying in sort of weekend- Lulu's got
the chicken pox so we can't really do much. We had plans to go
walking with the girls in Derbyshire but that will now have to be for
another time. Anyway, enjoy your weekend and see you soon!


Tuesday, 24 February 2015

A Tea Cosy


This is all about my new tea cosy. It's my latest finished project-
another tick in my things-to-make list. Hurray!


I've made tea cosies before- a couple to sell at craft fairs and another
two as presents- but this is the first time I've made one for my own use.
Until recently I've preferred tea bags to loose leaf tea. They're quicker,
easier, fuss-free. We have two tea pots in the house but we've seldom
used them. Then over the New Year I decided to use up this tin of loose leaf tea I was given ages ago and developed a real fondness for it.
They do taste better and I have come to enjoy the whole process of
making a 'proper pot' of tea. And in a funny way it feels to me like
 a more grown up way of making and consuming this favourite drink.
 So now that I'm a convert to loose leaf tea I use one of my tea pots
(the smaller of the two) everyday and it needs a little cosy to keep
it lovely and warm and so, of course, I just have it make it one.


I was going to crochet it but I couldn't decide which pattern
to pick- there are just so many brilliant ones out there!- and decided
to do it by sewing. I found my old pattern, adjusted the size a bit
and started cutting and sewing away. I wanted cherries to applique
on the outside and chose to make them using the crochet brooch
pattern from issue 43 of Mollie Makes. I love cherries, they're a
 favourite motif. I've added them before to other projects
 (you can see more here and here).


I'm really pleased with it. I like the combination of gingham, crochet
and little spots together. I'm glad I chose to make it this way.


It is also a treat to use. It's got the same waddling and backing material
that I've used for my patchwork blanket. It is thick and can keep
my tea pot warm for a long time-- a very cosy tea cosy!!


So that's my tea cosy. At the moment I'm making a couple of
pot holders for the kitchen. They'll take awhile to finish I think. We have
chicken pox in our house right now. Markie came home from school today with itchy spots that are unmistakably chicken pox so she's
off school for the rest of the week. I'll be busy giving cuddles and Calpol doses for the next few days. I doubt I'll have much time for sewing.
 We'll see. Anyway, thanks for stopping by here. I hope you're all having
a nice Tuesday evening. Have a lovely rest of the week!


Monday, 12 January 2015

Square by Square


One of my plans for 2015 is to make a patchwork blanket.
I already have the materials to make one so I got started last week.
 At the moment I'm stitching together my fabric pieces. I'm doing it square by square and it's slow going but I've decided that as long as
 I can work on it steadily and get it finished in a couple of months,
 I'll be very pleased.


I'm using two Moda charm packs that I've had in my fabric stash
 for quite awhile now. Well, two years to be exact. I guess it's about
time I use them! Anyway, I love the different colours and patterns
in all the pieces and having them pre-cut in 5inch squares make
them great to use for simple patchwork projects like this.


I have 81 squares in total and what I'm planning to do is create
small blocks made up of nine fabric squares and then sew these
together to create the whole blanket. 

These strips of squares were sewn together this morning.
Once I've ironed their seams I'll join them all to make my blocks.


So far I've completed two blocks. Seven more to go...


I think this will turn out to be a small blanket, more like
a throw or a lap quilt. But I'll be happy with that. Anything
to keep us warm and cosy is always welcome and
hugely appreciated!


Thanks for stopping by here. I hope it's been a good Monday
for you all. See you soon!


Thursday, 9 October 2014

Cushion Making (again)


Every now again I like to change our cushions around and make
some new ones. They're a really easy way to cheer up our living room
and they are quick projects too. I made these two in spring, quite
awhile ago, and I fancied a bit of a change. So a few weekends back
when I had some free time I decided to get my sewing machine out
and make a couple of new cushions for our sofa.


I used Bunting in Gold by Cloud 9 Fabrics for this cushion.
I love the simple pattern and the colours and as it's flannel it's
super soft and so lovely to touch. I didn't know it was flannel
when I bought it from this shop but I'm glad it is because it's
 such a great material for cushion making. It's making snuggling 
in the sofa even nicer now that the days and nights are colder.


This one is a tea towel that I bought in the summer sale from
 this online shop. It's too lovely to use for wiping dishes but perfect
for making a cushion cover, although I had to use calico for the
back as there wasn't enough material for both sides.


These are just simple, envelope style cushion covers, 
no buttons or zips but I splashed out a bit on the duck feather
cushion pads. Oh my, they are so wonderfully squishy and comfy--
we love our new cushions A LOT!


So another happy cushion making hour for me with very
happy results. Fingers crossed I'll have many more!


I hope you're all keeping warm and dry this week.
Thanks for stopping by! See you soon!


Wednesday, 18 June 2014

Peg Bag


I have another finished project that I'd like to share with you.
This one's a peg bag I've made to replace this one. I'm actually quite
fond of our old peg bag (I love those apple appliques) but after a year
of service it now has a few holes and the stitches on one side have
 unravelled a bit so I thought it's time I make us a new one.


I used pieces from an old table cloth that I bought ages ago
from a vintage shop. Part of it was used to make this cushion cover.
I kept the left over pieces hoping to use them for another project
and there was just enough to make this peg bag.


I like how the solid orange border looks like bias
binding along the opening. I added this small orange
button to keep it closed and for the loop I used one of the
girls' orange elastic hair bands.


I just love the colours and the simple retro design.
The flowers actually remind me a little of Orla Kiely's
Giant Abacus cushion.


So that's our new peg bag. It's bright and cheerful
and makes the job of hanging out the washing a little
bit more fun. It was easy to make too and didn't cost a
penny so I'm even more pleased!


Hope you're all well and having a great week.
We're off to the Isle of Wight for a week's holiday
but I'll try to be back here soon. See you!


Tuesday, 3 June 2014

New and Improved


This is the new top I've made which I mentioned in my
previous post. I was busy cutting and sewing on Wednesday
evening and finished it in time to wear on my birthday
the following day.


It is slightly different to the other two summery tops I've made.
It's longer so it's more like a tunic and instead of using bias binding
I've sewn a facing on the neckline and armholes. When I say 'facing'
it's really more like a lining, but it works a treat. I have seamed,
neatly finished edges plus they were quick to do too--hurray!


Towards the end of the evening I was too tired to make a thread
loop so decided to just put buttons on either side of this little slit
at the back instead. I think it looks okey. I've also altered the shape
of the armholes so they fit better and they do.


Here it is worn with a pair of leggings. I really like this 'Galloping
 Horses' fabric from John Lewis. They were two remnant pieces which
 I bought for £11. Not a bad price for a new top!


I think it's safe to say you'll be seeing more tops here in the 
coming months, especially now that I've discovered 'facings'. 
I keep learning as I go along and so many things are new to me
 so it's all very exciting. As always I'm already looking forward
 to making the next one. I might try adding a Peter Pan collar
 like Virna did with her beautiful dress. We'll see!


Thanks for stopping by. I hope you're all having a
great week. Back soon!


Tuesday, 27 May 2014

Sewing Lessons


Thank you for the lovely and encouraging comments on my
 summery top. I've been so delighted and excited with how nice it
has turned out that I had to make another one.


This time I've  added a pocket at the front and an inch or so to
the bottom hem.


I made this a couple of weeks ago and have loved wearing it
with a pair of leggings and a cardi.


I like the colours of the fabric and I'm chuffed that I have
another new top to wear this spring and summer. Next time
though I'll make sure I use matching cotton threads to help
 hide the wonky stitches and I'll stick to fabrics with smaller prints
to save me worrying whether the prints on the front and back pieces
are aligned or not. I should also remember to wash my fabrics
beforehand and zigzag stitch along the long edges to keep them
from unravelling later on. The armholes are still a little bit loose
so I've made some changes to the pattern. Hopefully this and all the
other lessons I've recently learned will help when I make the next one.
 I've already got the material and I'm planning to get sewing again
one evening this week.


Thanks for reading. Back soon!


Monday, 12 May 2014

Craft Room To Be


Last month when we did our spring clean I tidied up and did some
 reorganizing in the tiny space where I keep my sewing machine and all
the rest of my crafty bits and bobs. This little space is in our box room
which is currently Lulu's bedroom. Hopefully I'll be able to turn this
 into a sewing room/craft room when she moves to Markie's
 (bigger) bedroom this summer. I have to say I'm very much looking
forward to this--no more lugging of my sewing machine downstairs
 whenever I want to do some sewing and I can leave the mess and not
 have to tidy it off the dining table everytime. Anyway here it is after
last month's spring clean.


The photo below was taken just before I moved things around to
create a bit more space on the desk. The wooden shelf was a birthday
present and it's perfect for keeping button jars and other sewing
notions. The poster was bought from the London Transport Museum
shop a couple of years ago. I love the colours of the flowers and it
reminds me of a wonderful day we've had at Kew Gardens just before
we got married.


I love this wire wall storage from here. I've had to make do
with some  furniture we've already got and this is the only new
thing I've bought recently for this room. I think it's brilliant.


Next to the desk is a flimpsy old book shelf we've had for years. The
bottom half has DVD's and books while the upper shelves have some of
 my fabric stash plus tins filled with ribbons, rubber stamps and various
other craft things.


My husband thinks it's a bit bonkers that we have baskets
and old picnic hampers all over the house but I find them so useful.
These ones have the rest of my fabrics as well as some vintage 
sheets and linen.


I got this colourful pinny from a vintage shop in Whitby. I've
thought of re-using the material to make a small bunting
but we shall see. At the moment it's cheering up this little
 corner by the door and I rather like it there.


This chair was in my husband's bedroom when he was growing up.
His parents gave it us when we bought our house and I used it as
a nursing chair when the girls were babies. Nowadays it's used for
reading bedtime stories although I also like to sit here sometimes
when I want to look at magazines and have a bit of peace and quiet.


So far I think I'm nearly there with creating a nice little crafting place
for myself in this tiny room. It's more organized and definitely
looking much happier and more inspiring than before and I'm looking
forward to spending time here this summer. What I'd really like
 now is a good desk lamp next to the sewing machine, although a
radio would be quite nice too. I've added them both to my birthday
 wish list so fingers crossed...


Thanks for stopping by. Have a lovely week!